<?xml version="1.0" encoding="utf-8"?><feed xmlns="http://www.w3.org/2005/Atom" ><generator uri="https://jekyllrb.com/" version="3.10.0">Jekyll</generator><link href="https://0vos.github.io/feed.xml" rel="self" type="application/atom+xml" /><link href="https://0vos.github.io/" rel="alternate" type="text/html" /><updated>2026-03-16T04:14:50+00:00</updated><id>https://0vos.github.io/feed.xml</id><title type="html">Home</title><subtitle>Information of Qianqian Li</subtitle><author><name>Qianqian Li</name></author><entry><title type="html">Physics-Enabled 3D Asset Library for Robotic Simulation</title><link href="https://0vos.github.io/project-asset/" rel="alternate" type="text/html" title="Physics-Enabled 3D Asset Library for Robotic Simulation" /><published>2026-02-10T00:00:00+00:00</published><updated>2026-02-10T00:00:00+00:00</updated><id>https://0vos.github.io/project-asset</id><content type="html" xml:base="https://0vos.github.io/project-asset/"><![CDATA[<p>This project provides a physical 3D model asset library for robotic arm data collection. Specifically, it is mainly divided into the following parts:</p>

<ol>
  <li>Placement of simple convex objects</li>
  <li>Assembly of colliders for concave objects</li>
  <li>Assembly of articulated objects</li>
  <li>Generation of 3D objects</li>
</ol>

<p>We initially used Swift’s native 3D animation system, but it had two problems: first, the lighting reflection was very strange, causing some faces of the object to display properly while others appeared completely white; second, the composite colliders formed by assembling simple colliders constantly jittered on the desk, and no matter how many preventive measures were added, it could not be stopped.</p>

<p>Obviously, the second problem is fatal in the field of robotics simulation. SceneKit’s collision only has three forms: boundingBox, concavePolyhedron, and convexHull. Among them, boundingBox is the most accurate, but having only a cubic collider is definitely insufficient for a robotic arm’s pick and place tasks; concavePolyhedron should theoretically meet the collision requirements of concave objects (like bowls), but it can only be applied to static objects, and its support for collision accuracy is not very high (it causes clipping); convexHull can give objects a convex collider, but for some unknown reason, the object’s collider seems to always be larger than the visual body, and no matter how we adjust it, we could not build a minimal convex collider.</p>

<p>Therefore, we had no choice but to switch to an engine with more mature animation and physics systems like Unity (although it is mostly used for making games). Facts have proved that the many problems encountered in SceneKit above were quickly solved in Unity’s animation system. Moreover, in Unity, making objects click-to-place and continuously tracking their positions only requires attaching a C# script to the object in the scene, which is very convenient.</p>

<p>For the assembly of colliders for concave objects, since the xml files for Mujoco are written very clearly, the position, rotation, and size of each collider block can be easily obtained; we only need to place the collision blocks at different positions according to the Mujoco file and then combine them together.</p>

<div style="text-align: center; margin-bottom: 1em;">
  <div style="position: relative; padding-bottom: 56.25%;   height: 0; overflow: hidden; border-radius: 8px;  margin-bottom: 1em;">
    <iframe src="https://www.youtube.com/embed/lBdWdc6Gf84? autoplay=1&amp;mute=1&amp;loop=1&amp;playlist=lBdWdc6Gf84&amp; controls=0&amp;rel=0" style="position: absolute; top: 0; left: 0; width:  100%; height: 100%; border: 0;" allow="accelerometer; autoplay; clipboard-write;  encrypted-media; gyroscope; picture-in-picture" allowfullscreen="">
    </iframe>
  </div>
</div>

<p>For articulated objects, we chose SAPIEN’s articulated objects for assembly. The principle of assembly is similar to the assembly of composite colliders, but this time it involves parsing URDF files.</p>

<p>Finally, to adapt to complex task environments in reality, I added Rodin API for 3D model generation (which is relatively accurate in physical structure and basically reasonable in textures), and the generated models are processed as simple convex objects.</p>]]></content><author><name>Qianqian Li</name></author><category term="Projects" /><summary type="html"><![CDATA[A robust 3D asset library built in Unity for robotic arm tasks, featuring precise colliders, articulated assembly, and AI-generated models.]]></summary></entry><entry><title type="html">Interactive Mobile AR Anime Companion</title><link href="https://0vos.github.io/project-ARchat/" rel="alternate" type="text/html" title="Interactive Mobile AR Anime Companion" /><published>2026-02-01T00:00:00+00:00</published><updated>2026-02-01T00:00:00+00:00</updated><id>https://0vos.github.io/project-ARchat</id><content type="html" xml:base="https://0vos.github.io/project-ARchat/"><![CDATA[<p>AR Companion is a very fascinating concept. Imagine someone or a character you like interacting and chatting with you in real space (automatically, continuously driven by models), with a real physical height and weight. The experience is much stronger than just chatting with a character on an app. After all, the character can move freely on a large scale in the AR space and has a perception of the real world.</p>
<div style="text-align: center; margin-bottom: 1em;">
<div style="position: relative; padding-bottom: 56.25%; height: 0; overflow: hidden; border-radius: 8px; margin-bottom: 1em;">
  <iframe src="https://www.youtube.com/embed/6Nxquv-oggA?autoplay=1&amp;mute=1&amp;loop=1&amp;playlist=6Nxquv-oggA&amp;controls=0&amp;rel=0" style="position: absolute; top: 0; left: 0; width: 100%; height: 100%; border: 0;" allow="accelerometer; autoplay; clipboard-write; encrypted-media; gyroscope; picture-in-picture" allowfullscreen="">
  </iframe>
</div>
<div style="color: gray; font-size: 0.8em; margin-top: 0.5em;">This video shows the fun of having a character placed in AR space.</div>
</div>
<p>In fact, I researched this project because I was unsure which direction (AI or Graphics) had pressing bottlenecks to solve. I felt that if I could build this project deeply enough, I would definitely find the most critical parts to break through. On the other hand, I also need this project to recognize more problems in AI and Graphics. Research is only meaningful when built upon real problems.</p>

<p>I chose Giyu Tomioka from “Demon Slayer” as a test character because “Demon Slayer” is a very popular anime with plenty of public resources online. Moreover, Giyu Tomioka has a moderate amount of screen time in the anime—neither too little data like a minor episodic character, nor overly complex scenes like the main protagonist.</p>

<p>To achieve the ultimate goal, this project is destined to be massive. Therefore, I broke it down into two subprojects: one is data processing (server-side), and the other is spatial perception and interaction (client-side).</p>

<div style="text-align: center; margin-bottom: 1em; margin-top: 1em;">
  <img src="/assets/images/ARchatRAG.png" alt="AR Chat RAG" style="max-width: 100%; height: auto; border-radius: 12px;" />
  <div style="color: gray; font-size: 0.8em; margin-top: 0.5em;">Server-side setup process</div>
</div>
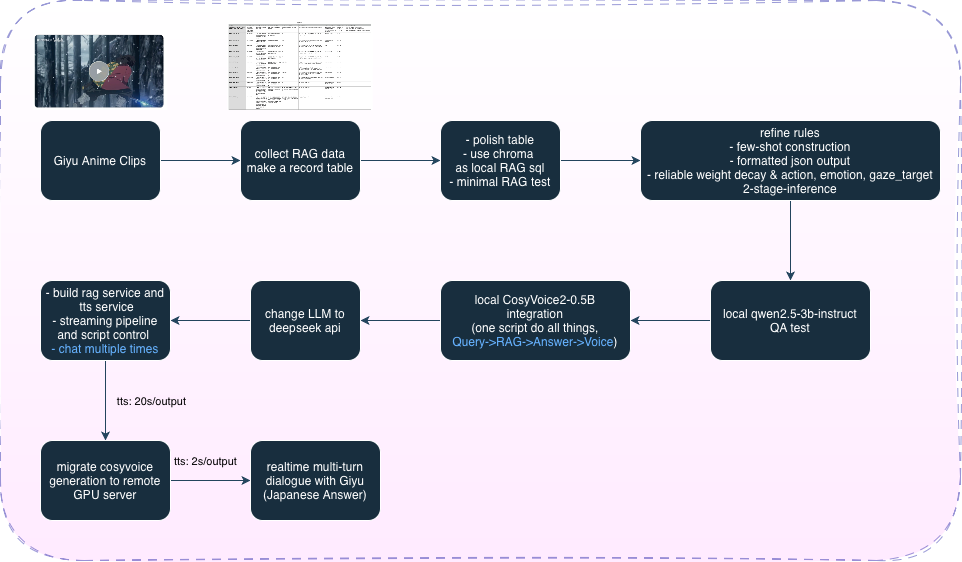
<p>The server first extracts dialogue and other information from original anime clips, organizes it into a table, and then uses local Chroma for RAG (connecting to an API or Ollama for answer generation; this part requires tweaking many things to achieve good RAG performance). After the answer text is generated, it connects to CosyVoice for voice generation (inferencing from the original anime audio). Finally, it’s converted into a service. Specifically, RAG still uses a local database but connects to the DeepSeek API for fast, high-quality generation, built as a resident service that can be started and stopped. Meanwhile, CosyVoice is deployed and service-enabled on an Ubuntu server (accelerated by an RTX 4090). Then, a Cloudflared tunnel is set up for each service. After this deployment, a mobile phone can run these two services anywhere with a network, completely getting rid of the dependency on a PC.</p>

<p>On the other hand, for the client, I chose to use Unity as a Library to embed the Unity framework into Swift development. The advantage of this approach is the convenience and flexibility of using advanced features from Apple’s native RealityKit and ARKit. The downside is that the latency in data transmission between Unity and Swift is higher than if the project were built directly in Unity. I still recommend building this kind of project directly in Unity for convenience and better results, adding Swift components only later when Unity encounters parts that are hard to solve.</p>

<p>First, the standard pipeline. I found a high-quality 3D model of Giyu Tomioka (FBX, rigged) online. I imported it into Mixamo to get the standard T-pose, downloaded it back into Unity to map an avatar to a Humanoid rig, and then downloaded multiple unskinned animations from Mixamo to apply to this Humanoid rig. I used MagicCloth2 to add bone-driven physics to the hair, haori, etc. (I didn’t use point-driven physics because the haori isn’t single-sided and cannot be split, making weight painting inaccurate). At the same time, I converted the model’s materials into anime-style materials and sketched out a basic animation state machine.</p>

<p>Next is the AR scene setup stage. Specifically, this aligns the phone’s camera with the camera in Unity space, and aligns the world origin and XOZ plane in Unity (Unity is y-up) with the origin and plane selected by the user in the AR scene. This part is quite tricky; a series of matrix transformations are required to rotate the phone camera’s view to the correct orientation (character feet pointing down) and establish the correct relationship where objects appear larger when close and smaller when far. After implementing this, if the character still drifts with the camera, it requires a combined transformation of the camera’s position relative to the origin and the character’s relative position to the camera, inversely transforming the character every frame to an absolute position relative to the origin to decouple them from the camera view (it would probably be much easier to use Unity’s AR Foundation). In this way, the character can move freely on a large scale in the overlapping space, and the observer can view them from different angles, near or far.</p>

<p>Finally, I built a SwiftUI app, filled the two services into the configuration, and all that’s left is to send messages on the interface and wait for a reply (real-time is still unachievable; it takes about 10 seconds to wait for voice generation, but most of the time is spent on the LLM’s API calls). Additionally, I improved optimizations by adding lip-sync animation while the character is speaking, gaze locking (looking at the user by default), and character shadows.</p>

<p>This project is considered quite complete now. Deeper research can be conducted when integrating with new tasks in the future.</p>]]></content><author><name>Qianqian Li</name></author><category term="Projects" /><summary type="html"><![CDATA[An interactive AR companion system integrating LLM-based dialogue, local RAG, and voice generation, driven by a Unity-Swift client.]]></summary></entry><entry><title type="html">Autonomous Virtual Vision for AR Characters</title><link href="https://0vos.github.io/project-neuVirtualVisual/" rel="alternate" type="text/html" title="Autonomous Virtual Vision for AR Characters" /><published>2026-01-22T00:00:00+00:00</published><updated>2026-01-22T00:00:00+00:00</updated><id>https://0vos.github.io/project-neuVirtualVisual</id><content type="html" xml:base="https://0vos.github.io/project-neuVirtualVisual/"><![CDATA[<p>The visual freedom of AR characters is a fascinating topic. Imagine your virtual girlfriend reading a book on the bed by herself, or walking around the room, and all you need to do is pick up your phone camera to see where she is during your leisure time. This is as exciting as Joi in <em>Blade Runner 2049</em>.</p>

<p>Existing physical robots are indeed one of the current hot topics, but robots are too expensive to build, have monotonous forms (e.g., mainstream ones are only humanoid robots, robotic dogs, drones, etc.), and their physical components are very fragile, falling apart with the slightest carelessness. They also have low scalability (because of too many dependencies). In contrast, various complex robots with different forms can be displayed in the AR space. Robot vision can also provide cameras with different resolutions and focal lengths by adjusting parameters. If it’s just about perceiving the space without making substantial impacts, such as chatting with a “ghost” (like an anime character or deceased people) in real space, all you need is a smartphone with AR. This is much cheaper and more universal than physical robots.</p>

<p>However, a major visual problem with AR characters is that they either have no vision and rely entirely on the phone user’s observation, or they can only see what the phone camera sees. Thus, I started researching how to let AR characters see things on their own. My idea is to generate a scene volume and load it into the Unity space where the character model is located, ensuring that the model’s position in the AR space completely matches reality. Then, by mounting a virtual camera on the character’s eyes, the world the character sees will be completely consistent with the world seen by people in reality. At this point, by invoking vision algorithms, the VLM can judge for itself what actions to take in this space.</p>

<p>However, the research did not go very smoothly. Initially, I wanted to use SLAM methods to generate precise scene volumes with 3D Gaussian splatting as primitives, since this is the most straightforward path. But existing precise SLAM-3dgs algorithms universally require CUDA support and devices that can measure depth in real-time, like depth cameras or LiDAR. Since I only have a Mac and an ordinary iPhone, implementing such algorithms is unrealistic. So I hoped to use photos or videos with only RGB information to build the 3D scene volume. I borrowed ideas from PhySIC (maybe a common method in the field), using DepthPro for depth extraction on the original image, then using MoGe to generate a relative scale point cloud for the original image, mapping it back to DepthPro’s depth, and using RANSAC to correct the depth shift. There was also the method of mapping DepthPro’s depth map onto a 3D surface for sculpting, and conducting inpainting reconstruction for objects segmented in the image. I also tried using the diffusion method Rodin for generation. However, the segmentation and inpainting method of DepthPro yielded mediocre results, and when predicting depth for stitching with low inpainting precision, the noise was amplified even more. The method of using DepthPro’s depth map for 3D surface sculpting actually obtained a relatively good result. The 3D surface method compensated for the sparsity of the point cloud, but it brought the problem of having too many unnecessary bridging surfaces between distant and near objects. Even if all bridging surfaces were cleaned up, some poor-quality but actually necessary objects, like walls, could easily be mistakenly deleted. Meanwhile, the diffusion-based Rodin method suffered from severe hallucinations. Once it involved relatively abstract objects, it could only generate scene volumes that looked similar but were actually completely different.</p>

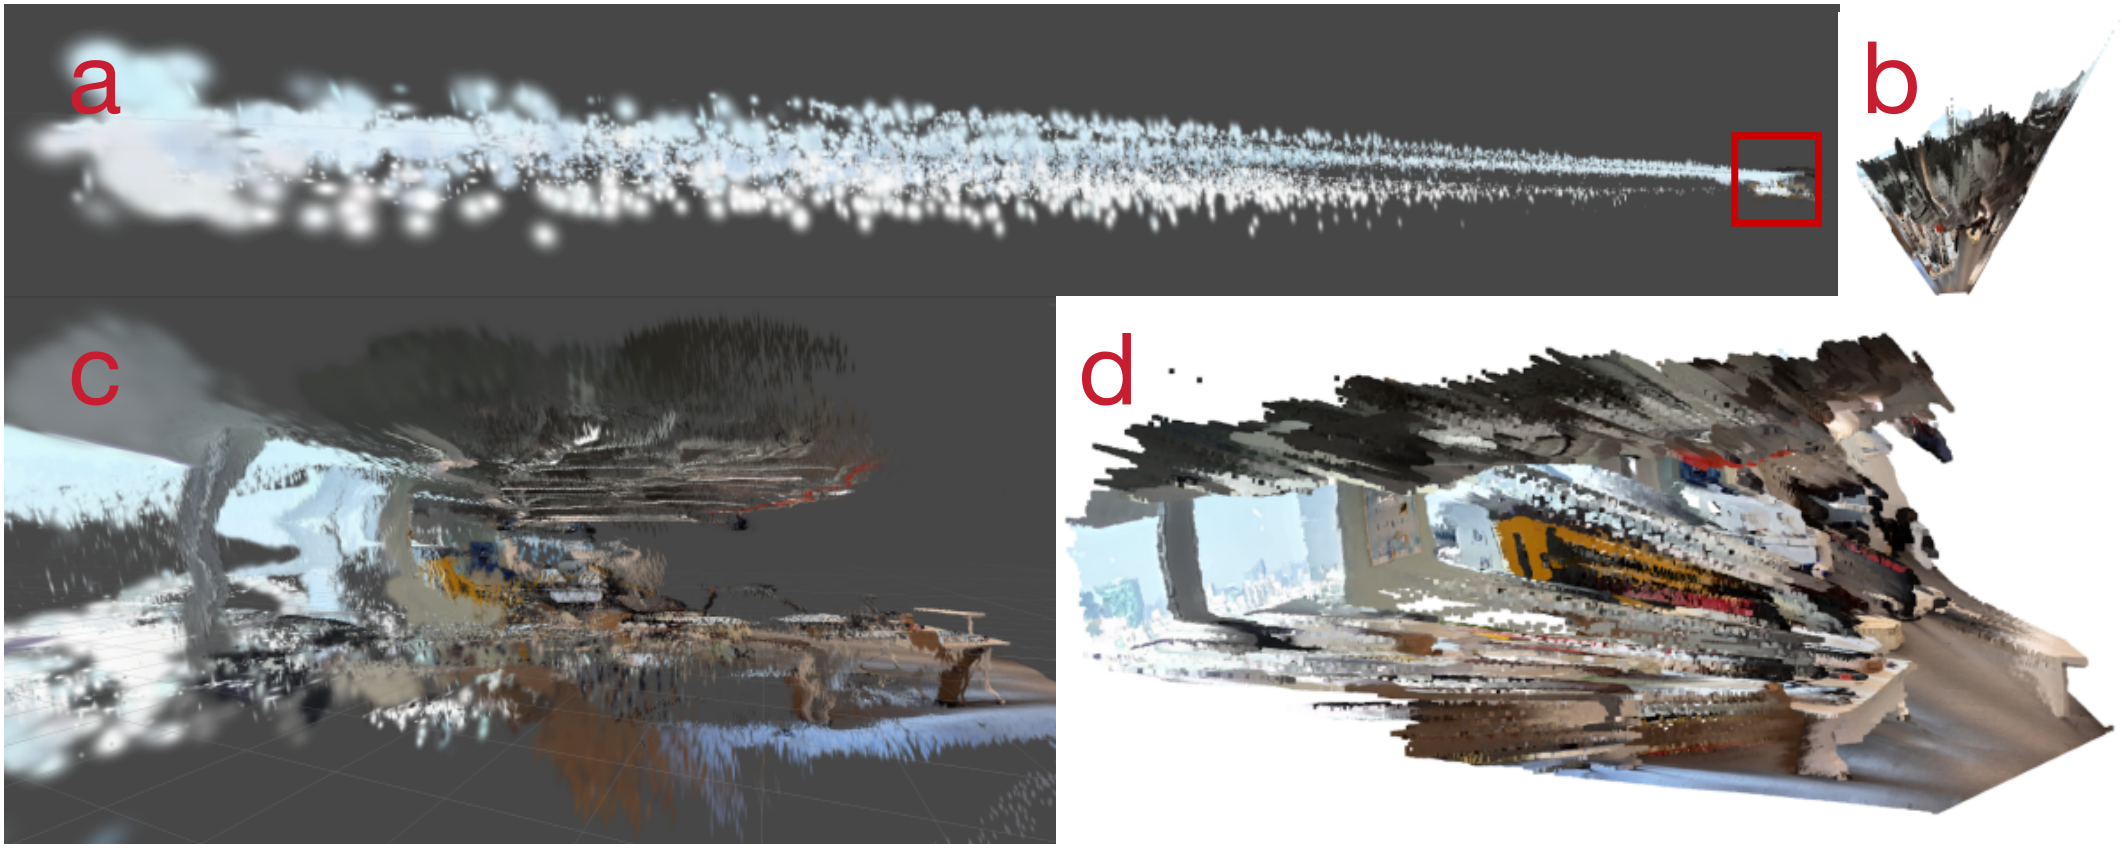
<p>Ultimately, I chose to use Apple’s newly released open-source model SHARP as the generation tool for the scene volume. SHARP can achieve high-definition photo-realistic effects in generating scene volumes. A major advantage of SHARP is that it can run on Mac. SHARP is also modified based on DepthPro, but it enhances its depth estimation accuracy, making the scene structure more realistic. For example, SHARP can reflect the depth of distant buildings out the window, whereas DepthPro only recognizes it as a painting. SHARP uses 3DGS as primitives instead of traditional points or surfaces, which ensures its color authenticity and the fullness of the scene. At the same time, it makes some points at depth discontinuities transparent, getting rid of visual bridging effects (or the hollow effects after cropping noise points). These advantages make virtual vision feasible under existing conditions.</p>
<div style="text-align: center; margin-bottom: 1em; margin-top: 1em;">
  <img src="/assets/images/virtualvisualProcess.png" alt="Virtual Visual Dive" style="max-width: 100%; height: auto; border-radius: 8px;" />
  <div style="color: gray; font-size: 0.8em; margin-top: 0.5em;">Obviously, SHARP's depth prediction accuracy (Figure a, the red box shows part of the studio, the far left is the distant building) is better than the pure DepthPro result (Figure b); SHARP's characteristic Gaussian primitives (as shown in Figure c) avoid to some extent the visual noise of "stringing" bridging points found in DepthPro (as shown in Figure d).</div>
</div>
<p>However, the scene volume generated by SHARP is not a standard 3dgs scene volume/model and cannot be directly displayed in the scene in Unity through plugins. Therefore, I specifically attached a splat-transform in the backend to convert SHARP’s scene volume into a standard 3dgs model. Then, it can be easily imported into Unity. With a simple addition of a camera and spatial arrangement work in the AR environment, the job is done!</p>

<p>In fact, there is still a lot of room for improvement in this project. Now that I have a phone that can capture image depth in real-time, I hope to achieve full-house scanning into a 3D scene volume in the future, and then automatically match it into the AR real space through calculations (rather than the current method of generating a scene volume from a single RGB image and then manually adjusting its position to correspond with reality). With my current knowledge, I think scanning into a scene volume using SLAM is relatively easy, while precisely matching it to the real AR environment is rather difficult. This might involve real-time adjustment of depth in real scenes and smooth optimization of other parts during the adjustment process.</p>]]></content><author><name>Qianqian Li</name></author><category term="Projects" /><summary type="html"><![CDATA[Empowering AR characters with independent spatial perception by building 3D scene volumes mapped to real spaces using Apple's SHARP model.]]></summary></entry><entry><title type="html">Huffman Data Compression Web Application</title><link href="https://0vos.github.io/project-neuHuffman/" rel="alternate" type="text/html" title="Huffman Data Compression Web Application" /><published>2024-12-31T00:00:00+00:00</published><updated>2024-12-31T00:00:00+00:00</updated><id>https://0vos.github.io/project-neuHuffman</id><content type="html" xml:base="https://0vos.github.io/project-neuHuffman/"><![CDATA[<p>The Huffman compression software is a two-week course design project at Northeastern University. It uses pure standard C++ libraries to build the server and the encoding/decoding logic. JavaScript is used for frontend communication and display logic, supplemented by HTML and CSS for web structuring and styling.</p>
<div style="text-align: center; margin-bottom: 1em; margin-top: 1em;">
  <img src="/assets/images/huffmanLogic.png" alt="Huffman Logic" style="max-width: 100%; height: auto; border-radius: 8px;" />
</div>
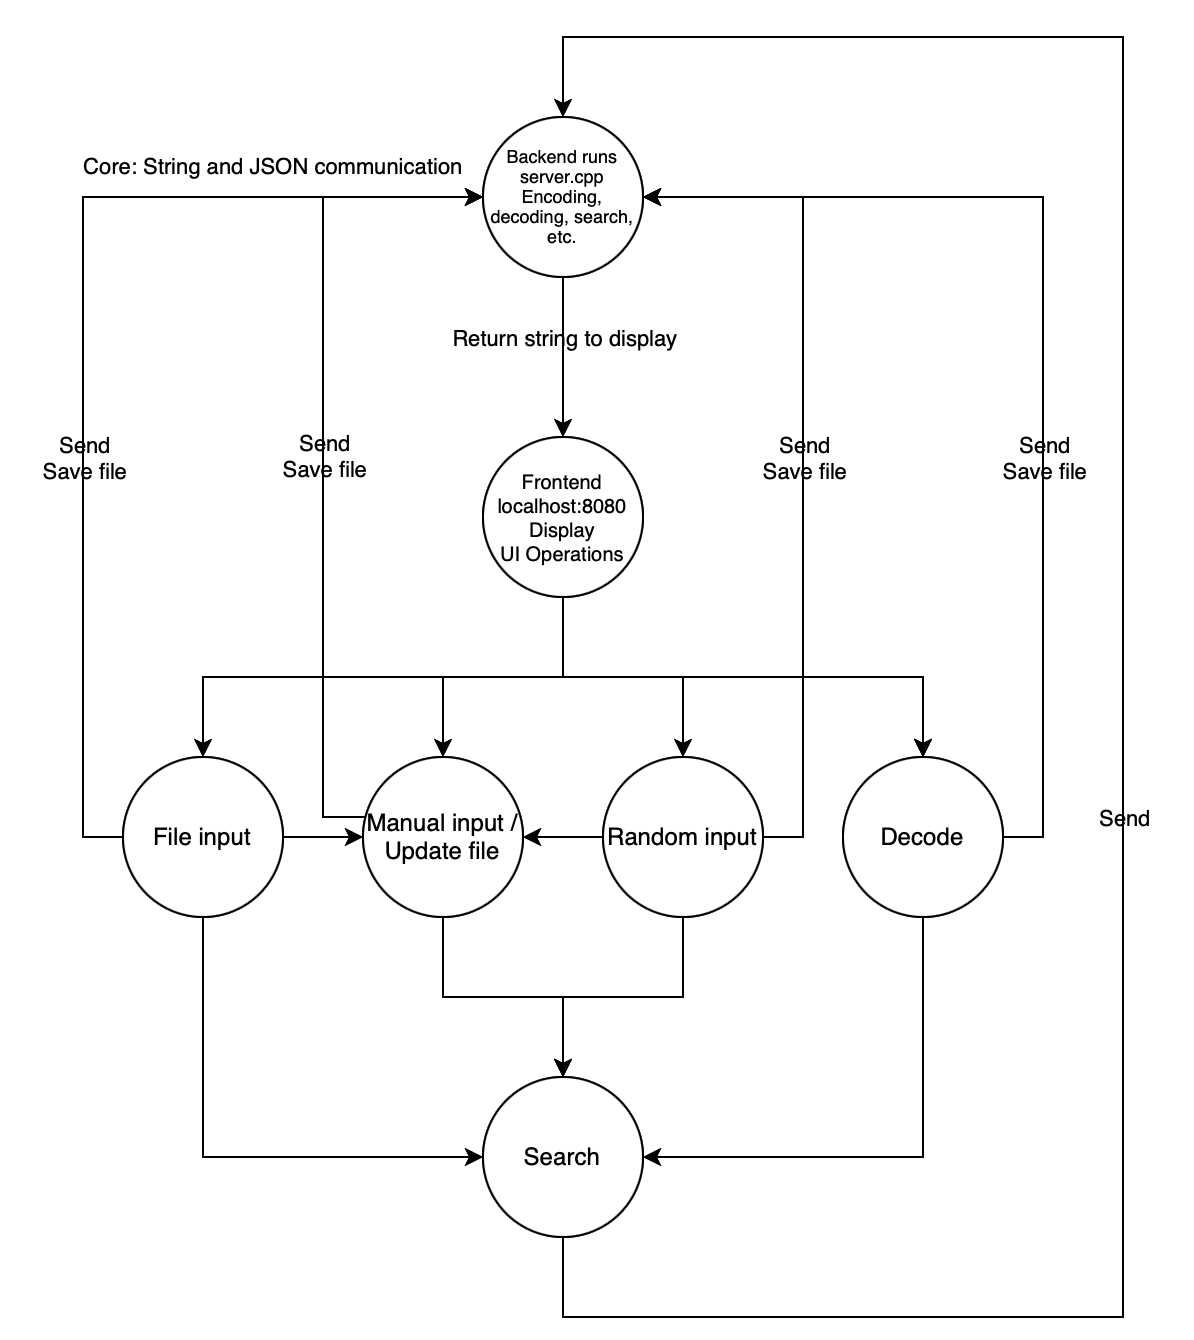
<p>This diagram shows the overall logic of the Huffman software.
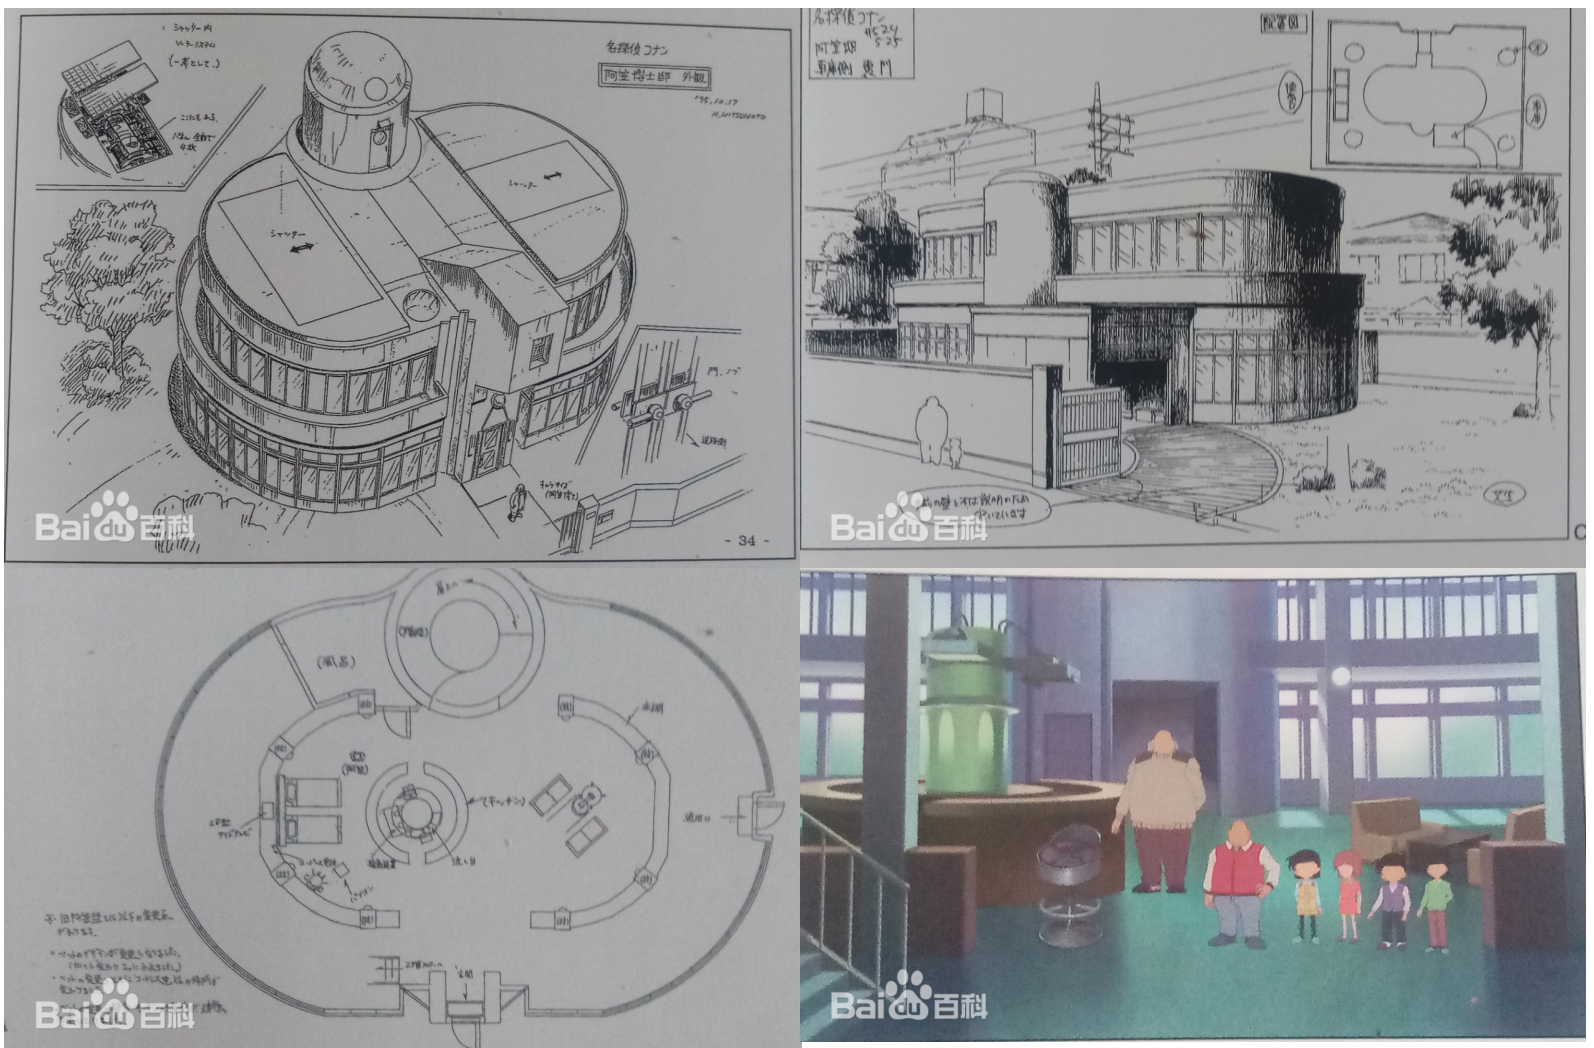
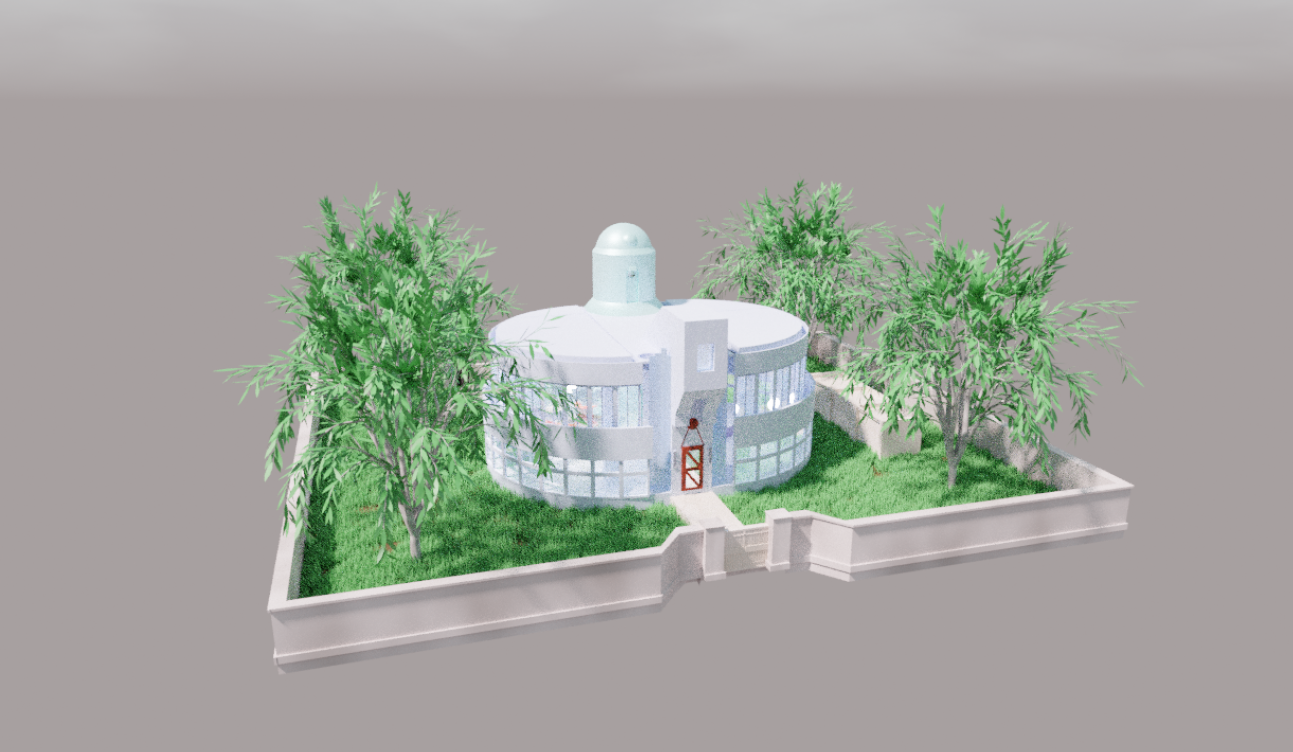
In fact, the Huffman encoding and decoding process is the simplest part of this project. It only requires converting the content (whether it’s text, images, or files) into Base64 encoding, and then storing it via Huffman encoding. Decoding represents the exact opposite. Writing the server and transmission logic using the C++ standard library is the most headache-inducing part. During the development of the project, information from the transmission stream was completely parsed using the <code class="language-plaintext highlighter-rouge">string</code> library to decompose HTTP headers and relevant content (by finding the start and end positions for truncation). Not to mention manually constructing JSON formats using strings, and handling Chinese characters and special characters (like <code class="language-plaintext highlighter-rouge">/</code>, <code class="language-plaintext highlighter-rouge">'</code>, <code class="language-plaintext highlighter-rouge">"</code>, etc.). In the phase of writing the server logic, we had to manually set the buffer size and write the buffering, looping, and concatenation logic for data transmission, so that data could be completely transmitted (since it needed to support up to 10MB image transmission), while ensuring that excessively large data wouldn’t clog the transmission stream and cause low-level errors.</p>]]></content><author><name>Qianqian Li</name></author><category term="Projects" /><summary type="html"><![CDATA[A lossless compression web app featuring a custom HTTP backend written entirely in standard C++ to handle streaming, encoding, and large file transmission.]]></summary></entry><entry><title type="html">3D Modeling and Printing of Professor Agasa’s House</title><link href="https://0vos.github.io/project-3DAgasa/" rel="alternate" type="text/html" title="3D Modeling and Printing of Professor Agasa’s House" /><published>2024-05-13T00:00:00+00:00</published><updated>2024-05-13T00:00:00+00:00</updated><id>https://0vos.github.io/project-3Dagasa</id><content type="html" xml:base="https://0vos.github.io/project-3DAgasa/"><![CDATA[<p>Professor Agasa’s house in “Detective Conan” has always been a place I really like. Not only is it the high-tech factory for Professor Agasa and Ai Haibara, but its unique house design and interior decoration are also very impressive. I used Blender to do 3D modeling and rendering from scratch according to the “Detective Conan” setting materials. Then, by researching how to add wall thickness, proper supports, and other physical details to the model, I 3D printed it using Bambu Studio with a Bambu Lab X1 Carbon 0.4 nozzle.</p>

<div style="text-align: center; margin-bottom: 1em; margin-top: 1em;">
  <img src="/assets/images/agasaDesign.png" alt="Agasa Design" style="max-width: 100%; height: auto; border-radius: 8px;" />
</div>
<p>This image shows the modeling reference setting diagram I used.</p>

<div style="text-align: center; margin-bottom: 1em; margin-top: 1em;">
  <img src="/assets/images/agasaHakase.png" alt="Agasa Rendered" style="max-width: 100%; height: auto; border-radius: 8px;" />
</div>
<p>This image shows the 3D Agasa house model after rendering with Cycles.</p>

<div style="text-align: center; margin-bottom: 1em; margin-top: 1em;">
  <img src="/assets/images/agasaInside.png" alt="Agasa Inside" style="max-width: 100%; height: auto; border-radius: 8px;" />
</div>
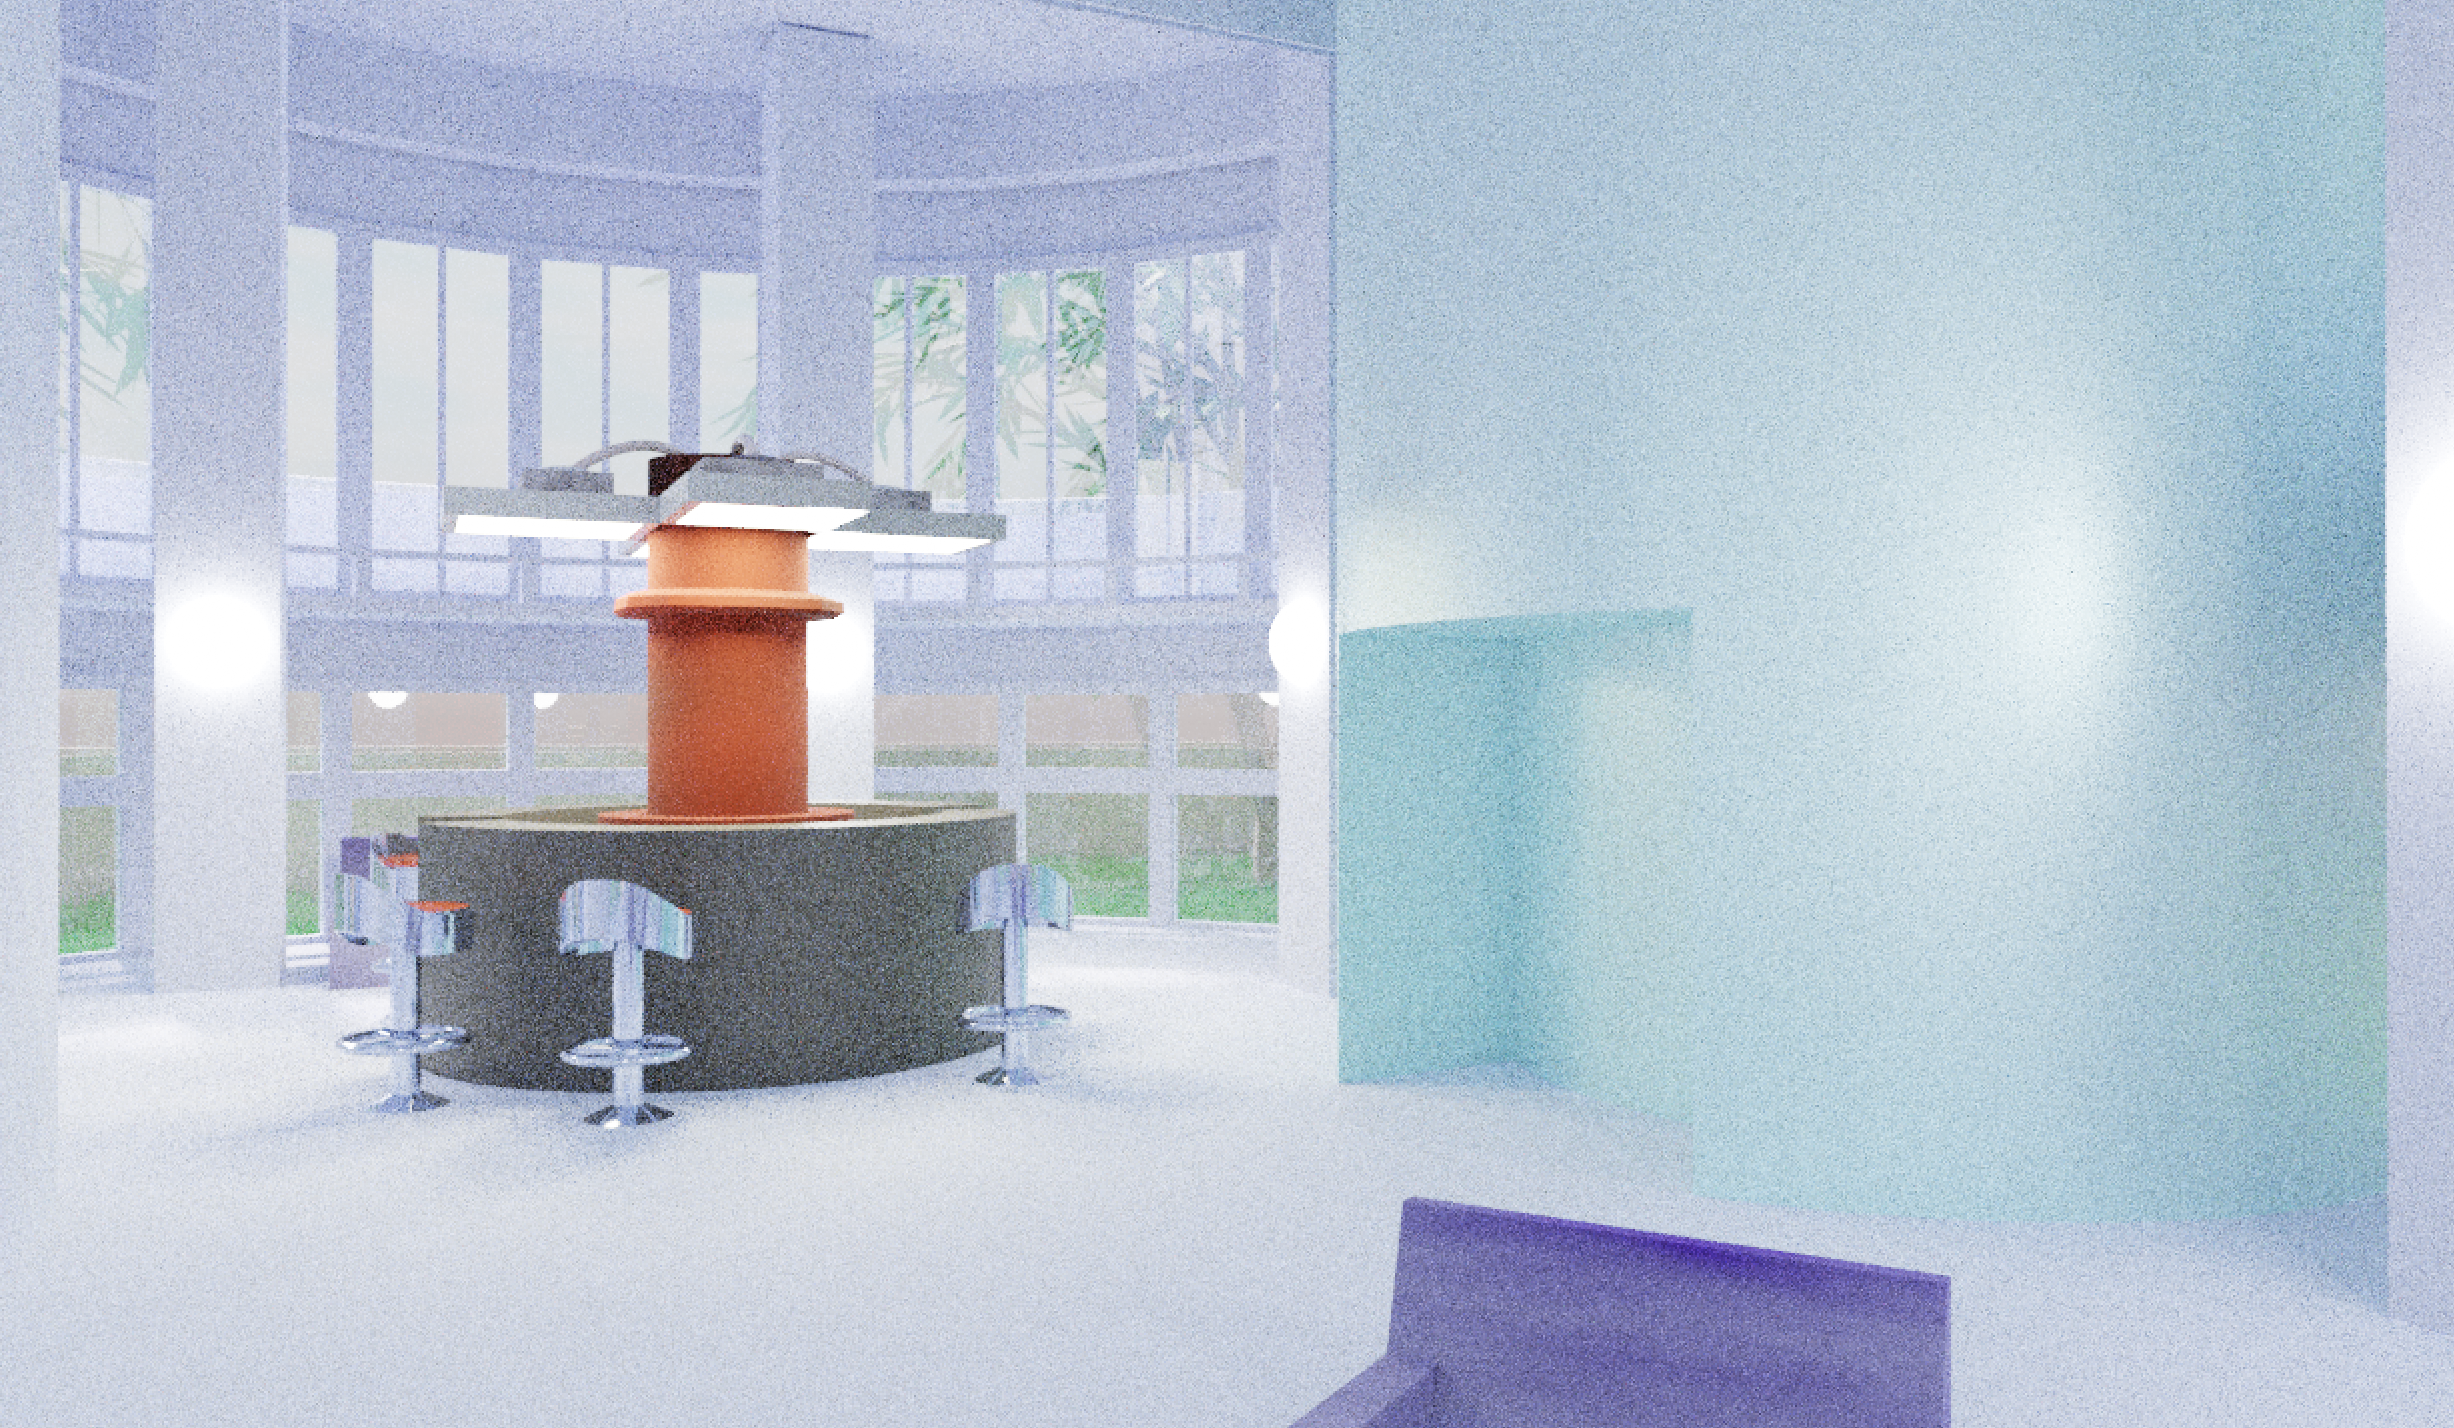
<p>This image shows the interior decoration of the Agasa house.</p>

<div style="text-align: center; margin-bottom: 1em; margin-top: 1em;">
  <img src="/assets/images/agasaPrintProcess.JPG" alt="Agasa Printing" style="max-width: 100%; height: auto; border-radius: 8px;" />
</div>
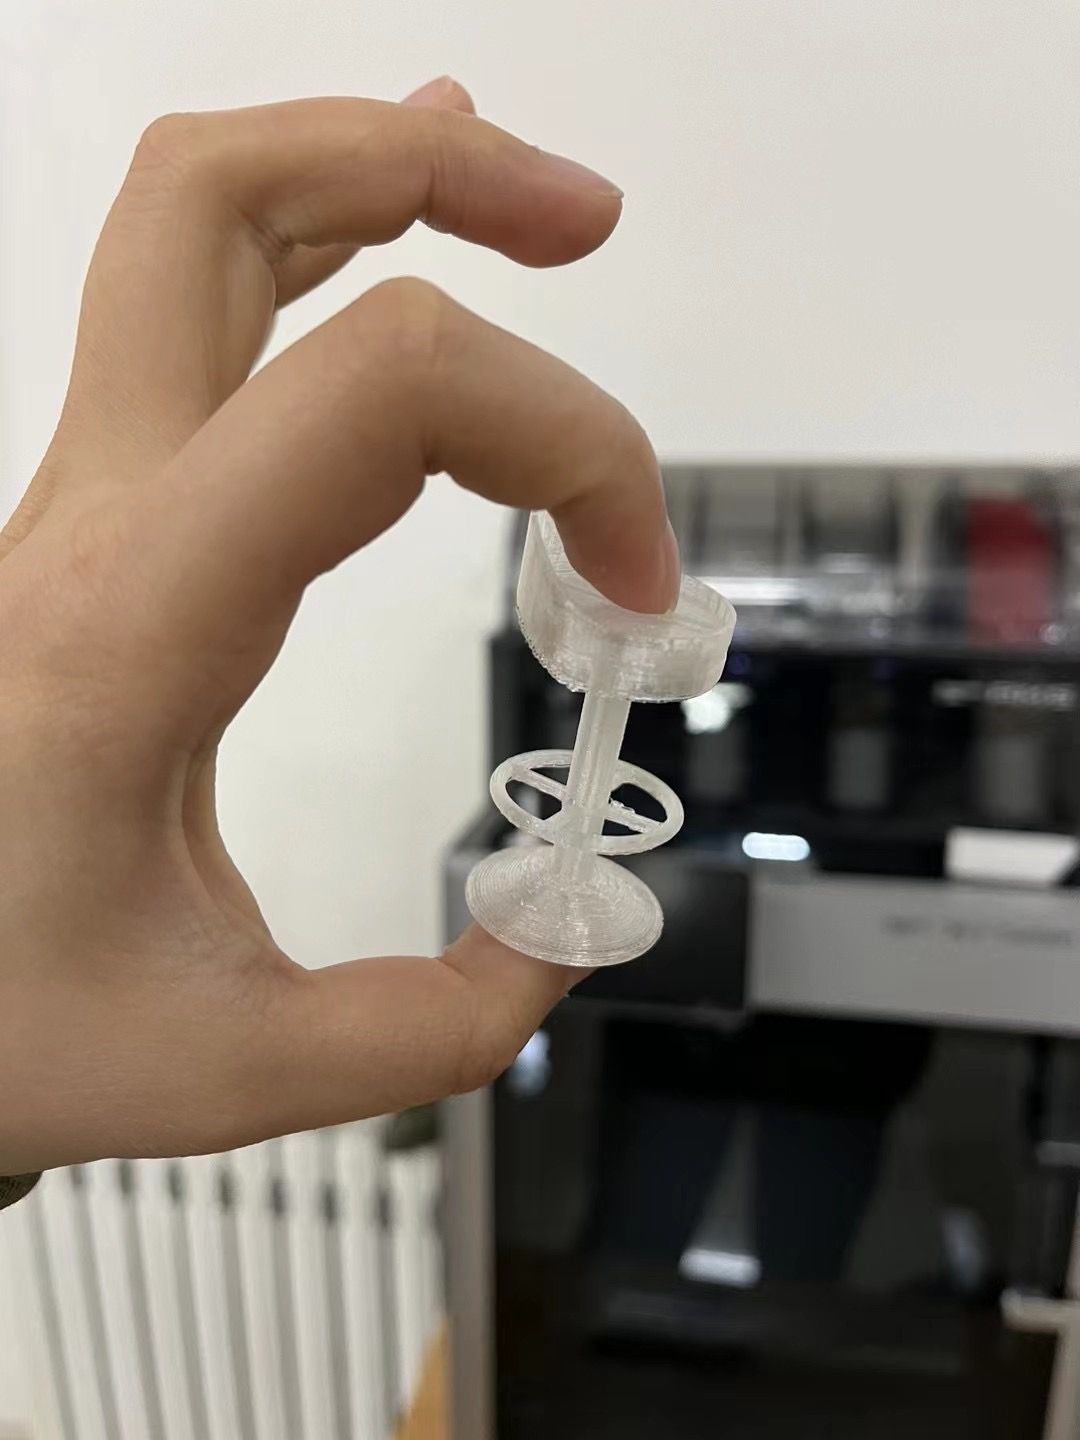
<p>This image shows my process of researching 3D printing. I have to say, for large models, the printing process takes a long time and is prone to errors (the “spaghetti” disaster caused by slight shaking), so it’s best to split the model into multiple assemblable parts and print them separately.</p>

<div style="text-align: center; margin-bottom: 1em; margin-top: 1em;">
  <img src="/assets/images/agasaFinish.png" alt="Agasa Printed" style="max-width: 100%; height: auto; border-radius: 8px;" />
</div>
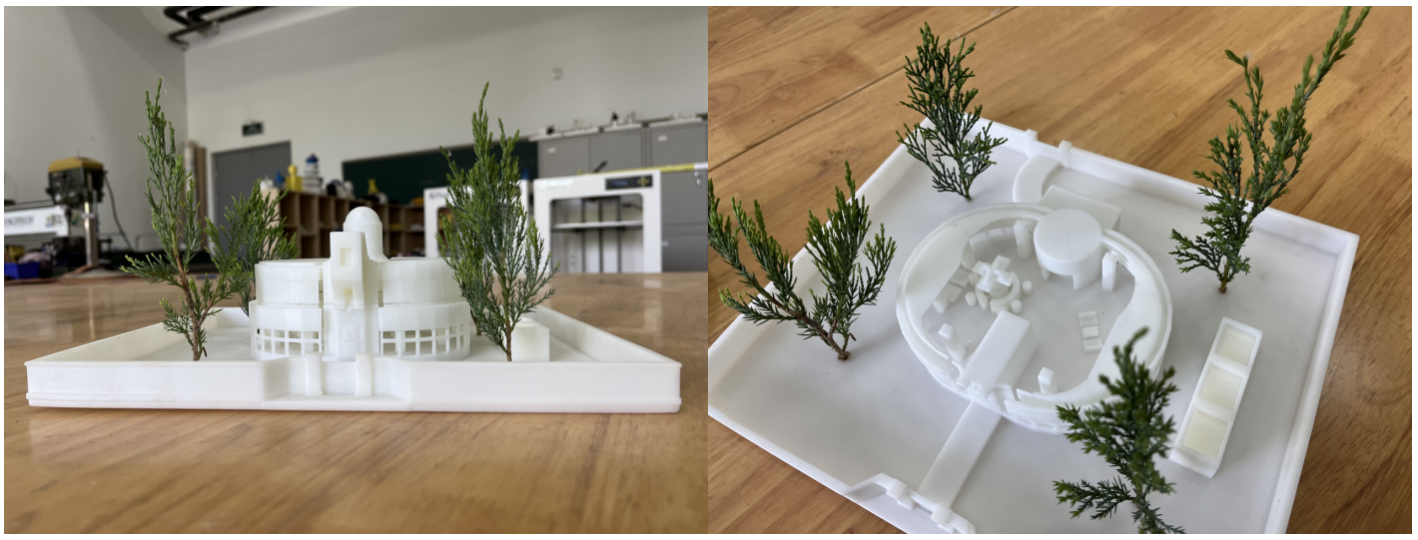
<p>This image shows the architectural model of the Agasa house after printing. The left image is the exterior structure, and the right image is the interior decoration.</p>]]></content><author><name>Qianqian Li</name></author><category term="Projects" /><summary type="html"><![CDATA[A complete workflow of designing and 3D printing a detailed architectural model of Professor Agasa's house from 'Detective Conan' using Blender.]]></summary></entry></feed>